6. Backgrounds
This Week
Now that you have a basic understanding of the NES tile graphics, we learn how to display one static non scrolling background.
There are three components used to generate backgrounds on the NES. First is the background color palette, used to select the colors that will be used on screen. Next is the nametable that tells the layout of the graphics. Finally is the attribute table that assigns the colors in the palette to areas on screen.
6.1. Background Palette
Like the sprites there are 16 colors in the background palette. Our previous apps were already loading a background palette but it was not being used yet. You can use the PPU Viewer in FCEUXD SP to see the color palettes.
6.2. Nametables
Like the sprites, background images are made up from 8x8 pixel tiles. The screen video resolution is 32x30 tiles, or 256x240 pixels. PAL systems will show this full resolution but NTSC crops the top 8 and bottom 8 rows of pixels for a final resolution of 256x224. Additionally TV’s on either system can crop another few rows on the top or bottom.
One screen full of background tiles is called a nametable, and the NES has enough internal RAM connected to the PPU for two nametables. Only one will be used here. The nametable has one byte (0-255) for which 8x8 pixel graphics tile to draw on screen. The nametable we will use starts at PPU address $2000 and takes up 960 bytes (32x30). You can use the Nametable viewer in FCEUXD SP to see all the nametables.
6.3. Attribute Tables
The attribute tables may be the most difficult thing to understand, and sets many of the graphics limitations. Each nametable has an attribute table that sets which colors in the palette will be used in sections of the screen. The attribute table is stored in the same internal RAM as the nametable, and we will use the one that starts at PPU address $23C0 ($2000+960).
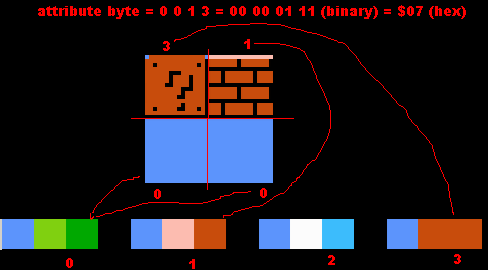
First the screen is divided into a 32x32 pixel grid, or 4x4 tiles. Each byte in the attribute table sets the color group (0-3) in the background palette that will be used in that area. That 4x4 tile area is divided again into 4 2x2 tile grids. Two bits of the attribute table byte are assigned to each 2x2 area. That is the size of one block in SMB. This limitation means that only 4 colors (one color group) can be used in any 16x16 pixel background section. A green SMB pipe section cannot use the color red because it already uses 4 colors.
When looking at a sample SMB screen, first the 4x4 tile grid is added and the palette is shown at the bottom:
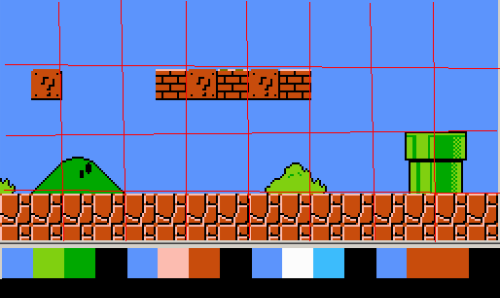
You can see there are 8 grid squares horizontally, so there will be 8 attribute bytes horizontally. Then each one of those grid squares is split up into 2x2 tile sections to generate the attribute byte:
No 16x16 area can use more than 4 colors, so the question mark and the block cannot use the greens from the palette.
6.4. Uploading the data
To set the background graphics your data has to be defined in your ROM using the .db directive, then copied to the PPU RAM. Some graphics tools will generate this data but here it will just be done manually. To keep it shorter only a few rows of graphics will be created. The same CHR file from SMB will be used here too. First the nametable data is defined, with each graphics row split into two 16 byte sections to keep lines shorter:
nametable:
  .db $24,$24,$24,$24,$24,$24,$24,$24,$24,$24,$24,$24,$24,$24,$24,$24  ;;row 1
  .db $24,$24,$24,$24,$24,$24,$24,$24,$24,$24,$24,$24,$24,$24,$24,$24  ;;all sky ($24 = sky)

  .db $24,$24,$24,$24,$24,$24,$24,$24,$24,$24,$24,$24,$24,$24,$24,$24  ;;row 2
  .db $24,$24,$24,$24,$24,$24,$24,$24,$24,$24,$24,$24,$24,$24,$24,$24  ;;all sky

  .db $24,$24,$24,$24,$45,$45,$24,$24,$45,$45,$45,$45,$45,$45,$24,$24  ;;row 3
  .db $24,$24,$24,$24,$24,$24,$24,$24,$24,$24,$24,$24,$53,$54,$24,$24  ;;some brick tops

  .db $24,$24,$24,$24,$47,$47,$24,$24,$47,$47,$47,$47,$47,$47,$24,$24  ;;row 4
  .db $24,$24,$24,$24,$24,$24,$24,$24,$24,$24,$24,$24,$55,$56,$24,$24  ;;brick bottoms
Then the attribute table data is defined. Each byte covers 4x4 tiles, so only 8 bytes are needed here. Binary is used so editing the 2 bits per 2x2 tile area is easier:
attribute:
  .db %00000000, %00010000, %0010000, %00010000, %00000000, %00000000, %00000000, %00110000
And finally the same color palette as SMB is used:
palette:
  .db $22,$29,$1A,$0F,  $22,$36,$17,$0F,  $22,$30,$21,$0F,  $22,$27,$17,$0F
Just like our previous palette loading, a loop is used to copy a specific number of bytes from a memory location to the PPU. First the PPU address is set to the beginning of the nametable at $2000. Then our 128 bytes of background data are copied. Next the PPU address is set to the beginning of the attribute table at $23C0 and 8 bytes are copied:
LoadBackground:
  LDA $2002             ; read PPU status to reset the high/low latch
  LDA #$20
  STA $2006             ; write the high byte of $2000 address
  LDA #$00
  STA $2006             ; write the low byte of $2000 address
  LDX #$00              ; start out at 0
LoadBackgroundLoop:
  LDA background, x     ; load data from address (background + the value in x)
  STA $2007             ; write to PPU
  INX                   ; X = X + 1
  CPX #$80              ; Compare X to hex $80, decimal 128 - copying 128 bytes
  BNE LoadBackgroundLoop  ; Branch to LoadBackgroundLoop if compare was Not Equal to zero
                        ; if compare was equal to 128, keep going down

LoadAttribute:
  LDA $2002             ; read PPU status to reset the high/low latch
  LDA #$23
  STA $2006             ; write the high byte of $23C0 address
  LDA #$C0
  STA $2006             ; write the low byte of $23C0 address
  LDX #$00              ; start out at 0
LoadAttributeLoop:
  LDA attribute, x      ; load data from address (attribute + the value in x)
  STA $2007             ; write to PPU
  INX                   ; X = X + 1
  CPX #$08              ; Compare X to hex $08, decimal 8 - copying 8 bytes
  BNE LoadAttributeLoop
The final changes are to tell the PPU to use the Pattern Table 0 graphics for sprites, and Pattern Table 1 for background:
LDA #%10010000 ;enable NMI, sprites from Pattern 0, background from Pattern 1
STA $2000
Enable the background rendering:
LDA #%00011110 ; enable sprites, enable background
STA $2001
And to tell the PPU that we are not doing any scrolling at the end of NMI:
LDA #$00
STA $2005
STA $2005
6.5. Putting It All Together
Download and unzip the master.zip sample files. This lesson is in background2. All the code above is in the background.asm file. Make sure that file, mario.chr, and background.bat is in the same folder as NESASM, then double click on background.bat. That will run NESASM and should produce background.nes. Run that NES file in FCEUXD SP to see the background. Set it to PAL Emulation so you get to see the whole screen.
Any background areas that you did not write to will still be using tile 0, which happens to be the number 0 in the SMB graphics. Try adding more nametable and attribute data to the .db sections, then changing the loops so they copy more bytes to the PPU RAM. You can also try changing the starting PPU address of the nametable and attribute table writes to move the rows further down.